![]() Main Menu | Reporting | My Reports | Select Type-Standard | Edit Button
Main Menu | Reporting | My Reports | Select Type-Standard | Edit Button
All standard reports share a number of common parameter selections.
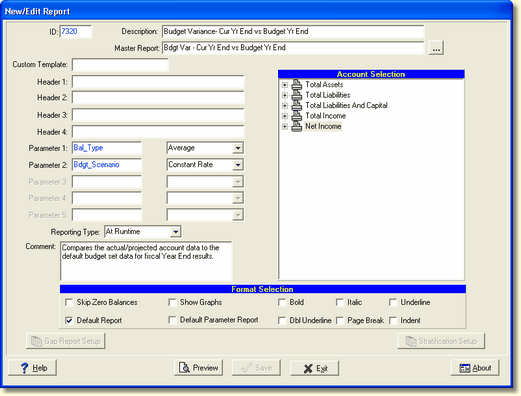
ID - This is the report ID assigned by the system.
Description - You can change the description of your report.
Master Report - This is the master report template the report is based on.
Custom Template - When a standard report is customized by FinSer for the institution, the custom standard report template number will be displayed here. Do not edit this field. Contact FinSer Support if changes to the custom standard report is desired.
Report Headers 1-5 - All template reports provide lines of available header information. A fifth header line is (not displayed on screen) for the Institution name. Any headers that are left blank, will not show on the report. If all headers are blank, Header1 will be defaulted to the Report Description.
Parameter 1-5 Selection - Based upon the template selected, a pre-defined number of parameters will be enabled and their available parameter choices pre-loaded in the parameter selection drop-down boxes. Some parameter selections have defaults, so choose from one of the options in the drop-down box. To see the parameters for each standard report, go to each report under the Standard Reports/Advanced Income Shock Templates chapter.
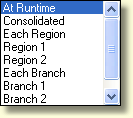
Reporting Type - If you have selected to operate IRR-Solutions® II at the consolidated institution level you may only select Consolidated in the drop-down box. You will not be able to select branches, regions, or At Runtime. If you have selected to run at the branch level, you may select Each Branch, Each Region, or the individual branches or regions as well as Consolidated. You can set a report to print/preview only by Consolidated or branches, regions but you can also set the reporting type to At Runtime, which will cause a Reporting Mode screen to be displayed each time you print/preview and you can decide at that time which you would like to see; by consolidated, by branches or regions. The previous runtime setting (consolidated, branches, or regions) will remain the next time you select the report to print/preview so that you can quickly print or preview the report.
Comment - This is a comment area the user can make notes concerning the report.
Skip Zero Balances - This option, when checked, will skip any account whose reporting line contains all true zero balances. You may see all zeros show up, but that means the zeros came from a rounding calculation which makes it zero. This is useful to reduce reporting to only those line items with balances. If over time, a particular account acquires balances, it will automatically be included in the report.
Show Graphs - This option, when checked, will print the graph page for the report selected (if a graph is available for this report.) However, not all reports generate a graph page, therefore, this check box is only active on the reports that include graphs.
Default Report - You can select which reports to display under the Reporting tab in each of the advanced modules. If the box is checked, this report will automatically be displayed. You can also change this option in the Reporting tab in each of the advanced modules. If the box is not checked, this report will not be displayed unless, in the modules, you check Show All.
Default Parameter Report - The default parameter report settings will be done at time of installation. This field is used to determine which parameter report to print when the Assumption Report button is selected in each assumption tab within each module.
Gap Report Setup - When the Maturity or Rate Gap report is edited, this button is highlighted and when selected, displays the Edit Gap Report Periods screen.
Stratification Setup - When the Stratification report is edited, this button is highlighted and when selected, displays the Stratification Parameter Setup screen.
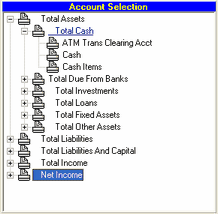
Account Selection - All template reports that are based upon the Chart of Accounts share a convenient way to select what accounts appear on a report. The tree view on the right side of the Add/Edit Report screen shows a view of the Chart of accounts. By default all accounts show a little printer icon, indicating that the account will be printed.
To configure an account not to print, right click to show the following popup menu.
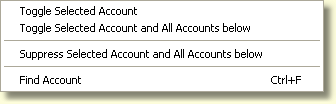
Toggle Selected Account - Choosing the first option, will change the status of the account from included in printing to excluded from printing.
Toggle Selected Account and All Accounts below - Choosing the second option, will change the status of the selected account and all accounts contained in the selected account from included in printing to excluded from printing.
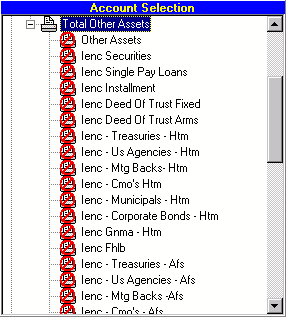
In the example shown above, we excluded all accounts contained within Total Other Assets, but chose to print the subtotal account Total Other Assets. This is indicated by the icon of the printer now overlayed with a red stop sign for all the accounts not to be printed.
To reverse an account from not being printed, to being printed, simply toggle the status of the account. To quickly toggle an account's printing status you can also double-click on the account. This will not affect the accounts under the subtotal account.

Suppress Selected Account and All Accounts below - Selecting this option will change the status of the selected account and all accounts contained in the selected account to exclude all from printing. This option speeds up the process of selecting only a few accounts to be printed.
Find Account - You can find an account by selecting the Find Account option. This will bring up the Find Account By Description.
Report Page Formatting Options - Below the Account Selection box, are listed 5 formatting check boxes you may select to customize the look of your reports.
Bold - You can bold any account and it's results.
Italic - You can italicize any account and it's results.
Underline - Placing an underline on an account will position the underline above the account you have selected. For example: If you placed an underline on Total Loans, the underline appears above the Total Loans line item.
Dbl Underline - Placing an double underline on an account will position the double underline below the account you have selected. For example: If you placed a double underline on Total Liabilities & Capital, the double underline appears below the Total Liabilities & Capital line item.
Page Break - To start a new page in the report, the page break option will break after the selected account. For example: If you want Total Liabilities to start printing on a new page, select the account or subtotal account prior to Total Liabilities to assign the page break option.
Indent - You can indent any account and it's results.
To apply formatting to an account, select the account and check the appropriate box in the grey area below the Account Selection area on the right side of the screen.
Preview - If you have made formatting changes to the report, select the Preview button to quickly view the report with the new formatting applied.
Save - Click SAVE to save the report changes.