Windows Operating Conventions
The IRR-Solutions® II software operates in a Windows® environment and utilizes the standard operating conventions. Below are some of the Windows® conventions that are used.
Command Buttons:
A command button, sometimes referred to as a push button, is usually rectangular in shape. The user clicks the button with the mouse to initiate a command. An example of a command button is displayed below:
![]()
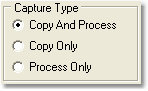
Radio Buttons:
Radio buttons, also known as option buttons, appear as a set of small circles. Only one choice can be selected in the set. When you select a radio button, a dot appears in the middle of the circle. When the button is not selected, the circle is empty. An example of a radio button appears below:
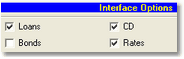
Check Boxes:
Like the radio button above, check boxes support options that are either on or off. Unlike the radio button, multiple selection of the check boxes can be made. A check box appears as a square box. When the box is selected, a check mark appears in the box. When the box is not selected, the check box is empty. An example of a check box option appears below:
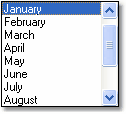
Combo Boxes / Drop-down List Boxes:
This box is designed to select only one item from the list. The list is displayed when the down arrow to the right of the box is selected. When the dropdown list is closed, the text box displays the current value. An example of a drop-down list box, closed and opened, is displayed below.
![]()
Tab Controls:
Tab controls are like dividers in a filing cabinet. When the user clicks on the tab, the screen focus changes to that tab. An example of tab controls are displayed below.

Scroll Bars & Boxes:
Scroll bars are vertical or horizontal bars at the bottom or on the right side of a screen. If the screen has more information than can be displayed at one time, then scroll bars are used to roll down or over to display the remaining data. The scroll boxes, located at either end of the scroll bar, can be used to quickly display the additional items by clicking, each click will move the screen up or down one item. An example of a scroll bar and scroll box is shown below.
Dialog Boxes:
A dialog box displays an exchange of information between the user and application. In IRR-Solutions® II, a dialog box can be displayed by pressing a Browse button. The example dialog box below is titled Open Security Request File. You can locate the file needed to request your security information.

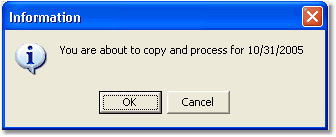
Message Boxes:
Message boxes are an important part of the IRR-Solutions® II software. They display important information about a particular process or condition. Please read all messages. An example of a message box is displayed below.
Pop-up Menus:
Pop-up menus display commands of a particular object and are used to minimize screen clutter. Pop-up menus are accessed by right clicking your mouse on an object that supports pop-up menus. An example of a pop-up menu is shown below.
Window Displays:
The IRR-Solutions® II windows can be moved to view other data behind it.
Tree View Controls:
A tree view control is a box which lists objects in an indented outline format according to their hierarchy. You can expand or collapse the outline by clicking on the "plus" or "minus" button to the left of the object. An example of a tree view is displayed below.
Drag and Drop:
With some tree view controls in IRR-Solutions® II, you have the ability to drag and drop accounts to other locations within the tree view. Select the account with the mouse and while holding the mouse button down, drag it to the desired location. The system also has command buttons to move accounts.
IRR-Solutions® II Operating Conventions
To make the IRR-Solutions® II program effective and easy to use, there are deviations from the standard Windows® user interface conventions. These deviations do not disable the standard Windows convention, which can still be used.
Use of ENTER key for data entry:
To make data entry more efficient, especially entry of numerical data, the operation of the ENTER key is the same as the TAB key.
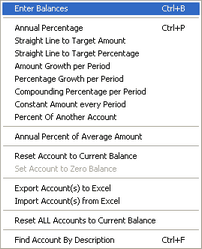
Use of Shortcut Keys:
Wherever possible, shortcut keys facilitate quick command execution without having to use the mouse. If a letter in a word is underlined, access that option by pressing and holding the [Alt] key while pressing the letter in the word that is underlined. An example of this is displayed below where the key combination of ALT C will display the data capture screen.
Pre-defined Entry Sequence:
With the use of the ENTER key, we have defined an entry sequence that takes the operator through a quick data entry sequence, but not necessarily covers all items on the screen. It Is recommended to use the ENTER key to move from field to field.
Focus Highlights:
There are a few screens in the system, by necessity contain much information. To provide additional help to the user, a yellow focus highlight surrounding the area with the current input focus is used.
SAVE Button Enables/Disables:
The SAVE button was implemented to indicate to the user when information was changed. It is disabled (grayed out) by default and will enable when information has been changed. The user needs to select the SAVE button to save the changed information permanently.
Text Colors:
Another slight departure from standard Windows® convention is our choice of text colors. We use black text in any field that can be edited by the user, and show read-only fields with blue text.
Windows Explorer Style Interface to Chart of Accounts:
Throughout the program, a Windows Explorer style interface of the chart of accounts has been used. This interface provides the means for selecting and accessing information. Some screens will limit the display to just the balance sheet accounts, while others will include the complete chart of accounts.
Entering Dates:
Throughout the program, dates should be entered using the format mmddyyyy. Example: March 31, 2002 will be entered as 03312002.
The Assumption Interface is based upon the visual representation of the Chart of Accounts in a tree structure form, user interaction with the tree structure and the display of icons to visualize current assumptions.
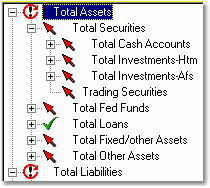
IRR-Solutions® II Tree Structure
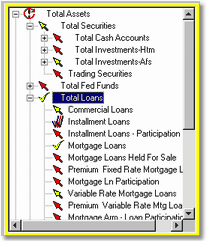
In the screen above you see the institution's General Ledger laid out in a tree structure which allows the user to access the various accounts and subtotals. This permits the user to set the assumptions at various levels of the General Ledger. The user can highlight or focus on a particular account or subtotal by using the up or down arrow keys on the keypad, or by left-clicking on the account with the mouse.
When the tree structure has the focus, a yellow border will be displayed around the box if the screen you're in allows data entry. If the screen does not allow data entry, you will not see the yellow border. The yellow border will show you where you are on the screen.
To select an account:
| • | click on the account, or |
| • | use the arrow keys on the keypad. |
Similar to Windows® Explorer, the tree structure expands and collapses to reveal accounts that make up the subtotals. For instance, clicking on the ![]() next to Total Fed Funds
next to Total Fed Funds
![]()
opens up and displays the accounts that make up the subtotal Total Fed Funds, as shown below:
![]()
To expand the account:
| • | click the plus sign |
| • | highlight the account and use the right arrow key on the keypad. |
The plus sign changes to a negative sign ![]() and the tree expands to show the various accounts that subtotal into Total Fed Funds.
and the tree expands to show the various accounts that subtotal into Total Fed Funds.
This way, if you want to make more specific assumptions at the account level, you can work your way down through the tree structure. If you do not see a ![]() or a
or a ![]() in front of an account, it means there are no general ledger accounts below it.
in front of an account, it means there are no general ledger accounts below it.
To close the account structure:
| • | click on the negative sign, or |
| • | use the left arrow key on the keypad. |